In LaTeX, forgetting the backslash in front of the sine function creates a sin.
Now that you have gained some experience with various computer tools, you may be wishing that these tools worked a little differently. Fortunately, most computer tools can be customized (within limits) to work the way you prefer. Today we will see how you can personalize your computer set-up: in computer-speak, how to "modify the defaults".
Now that you have some experience with LaTeX, you may be wishing that you could overrule some of LaTeX's default design decisions. Perhaps you would like to change the size of the margins, for example. In principle, you have complete control in LaTeX over the appearance of the page. Before you get carried away with customizing the visual design, read Leslie Lamport's warning from the LaTeX manual, page 91:
Before changing your document's style, remember that many authors make elementary errors when they try to design their own documents. The only way to avoid these errors is by consulting a trained typographic designer or reading about typographic design. All I can do here is warn you against the very common mistake of making lines that are too wide to read easily---a mistake you won't make if you follow this suggestion: Use lines that contain no more than 75 characters, including punctuation and spaces.
(Imagine how hard it would be to read a newspaper if the lines of text stretched across the whole page!)
In order to change the page layout, you need to know how LaTeX views the printed page. For historical reasons, LaTeX considers the upper left-hand corner of the printed material on the page to be one inch over from the left-hand edge of the physical page and one inch down from the top edge of the physical page. There is a header (possibly empty) across the top of the printed page, a footer (possibly empty) across the bottom of the printed page, and the body of the text in between.
To change a LaTeX page-style parameter, you use the
\setlength command in the preamble of your LaTeX
source file. For example, if you want the body of the text to be
15 centimeters wide, you type
\setlength{\textwidth}{15cm} in the preamble of your
LaTeX source file.
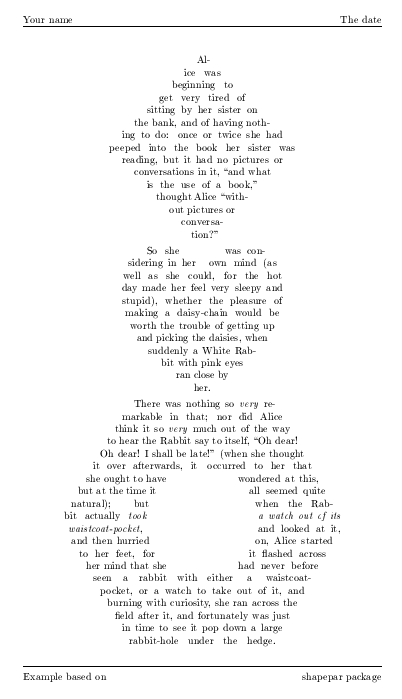
To get a feel for how this works, cut the following example out
with your mouse, paste it into a text editor, save it as a file
named alice.tex, and execute latex
alice and xdvi alice & in a terminal window.
\documentclass[11pt]{article}

\setlength{\textwidth}{3in}

\begin{document}
Alice was beginning to get very tired of
sitting by her sister on the bank, and of
having nothing to do: once or twice she had
peeped into the book her sister was reading,
but it had no pictures or conversations in
it, ``and what is the use of a book,''
thought Alice ``without pictures or
conversation?''

So she was considering in her own mind (as
well as she could, for the hot day made her
feel very sleepy and stupid), whether the
pleasure of making a daisy-chain would be
worth the trouble of getting up and picking
the daisies, when suddenly a White Rabbit
with pink eyes ran close by her.

There was nothing so \emph{very} remarkable
in that; nor did Alice think it so
\emph{very} much out of the way to hear the
Rabbit say to itself, ``Oh dear! Oh dear! I
shall be late!'' (when she thought it over
afterwards, it occurred to her that she ought
to have wondered at this, but at the time it
all seemed quite natural); but when the
Rabbit actually \emph{took a watch out of its
waistcoat-pocket}, and looked at it, and
then hurried on, Alice started to her feet,
for it flashed across her mind that she had
never before seen a rabbit with either a
waistcoat-pocket, or a watch to take out of
it, and burning with curiosity, she ran
across the field after it, and fortunately
was just in time to see it pop down a large
rabbit-hole under the hedge.

\end{document}
If you make the text width negative via
\setlength{\textwidth}{-3in} what do you think will
happen? Try it and see. What happens if you make the text width
ridiculously big via \setlength{\textwidth}{100cm}?
Here are some other common LaTeX page-style parameters that you
can adjust by using the \setlength command in the
preamble of your source file.
\textheight
\topmargin
\headheight
\headsep
\topmargin to be negative.
\footskip
\oddsidemargin
\evensidemargin parameter.
Here are three exercises to test your understanding of LaTeX's page-style parameters.
\setlength{\textwidth}{3in}
       \setlength{\textheight}{\textwidth}
what happens?
What if you type \setlength{\textheight}{\textwidth}
\setlength{\textwidth}{3in} in the other order?
\setlength{\textwidth}{7.5cm}
\setlength{\oddsidemargin}{8.5in}
\addtolength{\oddsidemargin}{-7.5cm}
\addtolength{\oddsidemargin}{-0.5\oddsidemargin}
\addtolength{\oddsidemargin}{-1in}
what is the result?
We saw previously how to convert a Maple worksheet to a LaTeX document. After using Maple's Export to LaTeX feature, you changed the top lines of the document to read something like
\documentclass[12pt]{article}
\usepackage{maplems}
and then LaTeX would format the Maple input and output fields to look like they did in the Maple worksheet, and LaTeX would format the text fields in its usual way.
When you used this feature, you found that the page style
changed. In particular, a header appeared that said "Maple V
Release 3." Some less visible changes that Maple made to the page
style are the following. (Here ex is a dimension
that is font-dependent: it is approximately the height of the
letter x in the current font.)
\setlength{\topmargin}{-.2in}
\setlength{\textheight}{8.75in}
\setlength{\textwidth}{6in}
\setlength{\headheight}{2.5ex}
\setlength{\headsep}{.17in}
\setlength{\oddsidemargin}{0.25in}
If you do not like Maple's choice of style, you could try to undo
all Maple's changes to the default LaTeX style---but there is an
easier way. If you change the \usepackage{maplems}
line to \usepackage{mapleenv} then you should get the
same formatting of Maple input and output regions but without the
changes to the page style.
The default LaTeX page style has an empty header and a footer
containing the page number. If you put
\pagestyle{empty} in the preamble of your source
file, you get both an empty header and an empty footer. If you
put \pagestyle{headings} you get an empty footer and
a header containing the page number (and possibly some other
information, depending on the document class).
It is also possible to personalize the headers and footers, as we
will see momentarily.
Since LaTeX is a public domain language, there is no toll-free
telephone support line! However, the LaTeX community provides
support to itself through the comp.text.tex newsgroup.
Also, LaTeX users have written a large number of useful macro
packages that are freely available through the Comprehensive TeX
Archive Network (CTAN). Let's download Piet van Oostrum's
fancyheadings package and use it to customize page
headers and footers.
Use your Web browser to go to the CTAN-Web at
jasper.ora.com. Click on the keyword link and use
the search form to search on "fancyheadings". You will get back
several hits. Since
tex-archive/macros/latex209/contrib/fancyheadings
looks promising, try clicking on that. You should see an entry
that says
fancyheadings.sty 02Jun95 5860 bytes
Click on this entry and you will get a list of archive sites
to choose from. The closest one to College Station is
ftp.shsu.edu. You can either click on this entry and
then use the Save As feature of your Web browser, or you can try
holding down the Shift key while you click the left mouse button,
which may pop up a Save As window automatically. Save the file as
fancyheadings.sty in your home directory.
Now you've got a copy of the fancyheadings package.
Let's try using it. Take the above example from Alice's
Adventures in Wonderland and put the following code in the
preamble. (Here \thepage makes LaTeX print the
current page number, and \today makes LaTeX print
today's date.)
\usepackage{fancyheadings}
\pagestyle{fancy}
\lhead{Your favorite color}
\chead{Your name}
\rhead{Your favorite dessert}
\lfoot{\bfseries An example}
\cfoot{\thepage}
\rfoot{\today}
\setlength{\headrulewidth}{0.4pt}
\setlength{\footrulewidth}{0.4pt}
\setlength{\headheight}{15pt}
As you will see when you run latex alice and
xdvi alice &, the fancyheadings package
makes three-part headers and footers. Any of the parts can be
left empty. The thickness of the horizontal rules is
adjustable; if you set the thickness to 0pt then the
rule will not appear.
The fancyheadings package has some still fancier
options. Grab the documentation fancyheadings.dvi
from CTAN to find out more.
There are many more packages for LaTeX; see the LaTeX Companion.
If you use Netscape, click on "Options" on the menu bar. On the "Window and Link Styles" screen, click on the diamond for the font size you prefer. Then hold the left mouse button down on the "Window and Link Styles" bar and select "Cache and Network". You can click on "Clear Disk Cache Now" to empty the cache (if you are running out of disk space). Also, in the "Disk Cache" window you may want to set a low limit (or even zero) to keep Netscape from filling up your disk quota in the future. Then click on "OK". You need to click on "Options" once more and click on "Save Options" so that Netscape will remember your choices in the future.
If you use Mosaic, the only customization I recommend is to
change the default font. You can change fonts interactively by
clicking on "Options", then "Fonts". Or you can set the default
font in your .Xdefaults file as
described below .
When you issue commands in a terminal window, you are interacting
with the computer through a shell program (by default,
the C shell). For example, when you type the command
ls, the shell interprets this as an instruction to
display a list of your files.
You can customize the behavior of the shell by defining your own
shorthand commands and by setting the values of shell variables.
For example, you may be used to MS-DOS, where the command
dir is used to display a directory listing. You can
tell your shell to use the same command name by typing alias dir
ls (this makes dir a synonym for
ls).
Here are some other examples of commands you can use to customize your shell.
alias dir ls -l
dir produce a directory listing
in long format (including file permissions, file size,
date of last modification).
set prompt="Your wish is my command: "
setenv XFILESEARCHPATH /usr/openwin/lib/app-defaults/x3270
tam2000 to get x3270 to work
there. Caution: if you already have this variable defined
(try echo $XFILESEARCHPATH in a terminal
window to see if you do), you may want to use something
like setenv XFILESEARCHPATH
${XFILESEARCHPATH}:/usr/openwin/lib/app-defaults/x3270
to append the new path to the end of the old one.
It would be boring to type in these commands every time you open
a terminal window, so UNIX provides an initialization file named
.cshrc (note the initial dot) where you can record
such customizations once and for all.
You probably have a skeleton .cshrc file already.
Set its permissions with the command chmod 600
~/.cshrc in a terminal window.
Load .cshrc into your text editor,
append the commands you want, and save the file. (Changes will take
effect the next time you open a terminal window, or you can make
the changes take effect immediately by issuing the command
source .cshrc.)
Here is another piece of code some people like to put in the
.cshrc file. It sets the prompt to display the name
of the current working directory.
  alias setprompt 'set prompt="${cwd}> "'
  setprompt
  alias cd 'chdir \!* && setprompt'
You can adjust the appearance of windows on your desktop by
setting resources. You do this by entering the values
you want in a file named .Xdefaults in your home
directory. Typically you set the resources for each individual
program. For example, here are some entries from my
.Xdefaults file.
xterm*font: lucidasanstypewriter-18
xterm*boldFont: lucidasanstypewriter-bold-18
xterm*vt100*background: white
xterm*vt100*foreground: black
Mosaic*defaultFontChoice: Lucida Bright Large
MapleV.queryOnExit: false
Alt-X
without prompting me for confirmation. Use at your own risk!
MapleV.geometry: 750x800
emacs.geometry: 80x35+120+35
emacs.font: lucidasanstypewriter-bold-18
Copy any of these settings that you like into your text editor
and use the "Save As" feature to write the settings into a file
named .Xdefaults in your home directory. The
settings will take effect the next time you log in, but you can
make the settings take effect immediately by issuing the command
xrdb -merge ~/.Xdefaults in a terminal window.
Special note to calclab users: To keep his life
simple, the system administrator for the calclab machines has
disabled the usual mechanism that reads the
.Xdefaults file when you log in. However, if you feel
that setting some resources would make your computing life more
productive, go ahead and do it. On the calclab machines, you can
get the system to read your .Xdefaults file at
start-up by the following bit of chicanery. Use a text editor to
make a file named .mapleinit containing the line
system(`test $DISPLAY && xrdb -merge $HOME/.Xdefaults`):
(cut it out with the mouse to avoid
typing errors). Explanation: at start-up, the calclab machines
open a Maple session, then Maple reads an initialization file named
.mapleinit, and the above line tells Maple to call
the operating system to load the .Xdefaults file.
You can usually find out the names and available settings for
resources by reading the manual pages for a program. Type
xman & in a terminal window to open a manual
browser.
You may want to personalize the applications that open up when you first log in. Perhaps you do not want a clock in the upper right-hand corner of the screen, or perhaps you would like a terminal window to open automatically when you log in. How you accomplish this depends on the computer system.
Alt-F4 key combination.) The only useful
option you have is to start up a terminal window
automatically. You can do this via the
.mapleinit hack I suggested above: put the
line system(`test $DISPLAY && xterm &`): in
your .mapleinit file.
/var/xdm/Xsession that you
can override by creating a file named .openwin-init
in your home directory. Any commands you put in this file (be
sure to end each command with the &
character) will be
executed at start-up in place of the system defaults. The
default .openwin-init file is essentially
       	rclock -geometry 88x88-0+0 -bg black -fg white &
	mailtool  &
(It starts a clock and a mailtool.) Here is one example of
an alternate .openwin-init file:
       xclock -geometry -10-0 -digital -bg white -fg black  &
       xbiff -geometry -420-0 &
       xterm &
This starts a digital clock in the lower right-hand corner
of the screen, an xbiff client that notifies
you of incoming mail, and a terminal window. I used to add
to the xclock line the code
-fn '-b&h-lucidatypewriter-bold-r-normal-sans-25-*-100-100-*-*-*-*'
to make the clock use a large font. Currently my
.openwin-init file says (essentially)
emacs & and nothing else.

shapepar package from CTAN, and use its
\shapepar{\diamondshape},
\shapepar{\heartshape}, and
\shapepar{\nutshape} commands to typeset the
following. (You will probably have to tinker with the page
layout to get the document on a single page: that is part
of the exercise.)
 Last modified and validated: Wed Nov 15 09:19:23 1995